Wireguard VPN Setup 101 — star topology
Introduction
This blog will describe a Wireguard setup I use to easily connect different locations, clients and networks together. Wireguard is a free light weight and easy to setup VPN server with clients for most operating systems and devices.
This setup is build with a central cloud based Wireguard server (on the Google Cloud, but use any (cloud) provider you want) that is used to connect all other clients and can also function as a VPN gateway for internet client traffic. Clients can be Raspberry Pi’s as gateways or more traditional clients like laptops or phones.
The reason I use a setup like this is that I want to be able to connect and reach different locations and devices easily, expand the network in a simple way and not wanting to mess with any port forwarding type of configurations. It allows me to configure which devices are reachable behind the Wireguard clients and gives me the ability to connect with a laptop to a NAS or IoT device behind any of the Wireguard clients/gateways from any location.
originally published here
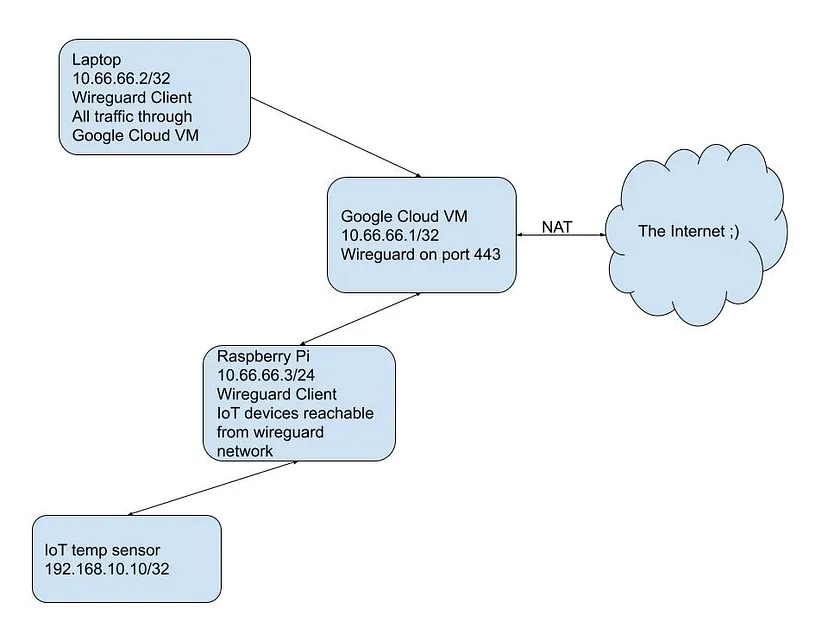
Network Diagram
I know, my drawing skills are horrible….
Setup Google Cloud Virtual Machine
The virtual machine is created on the free tier in the Google Cloud. A f1-micro instance type running the Ubuntu base image works fine.
As we are going to allow incoming Wireguard traffic over port 443 we need to add a GCP firewall rule here to allow UDP traffic into your VM on port 443. Source IP range should be 0.0.0.0/0, protocol UDP and port 443.
Do some general OS updating before we get the local DNS server and Wireguard up and running:
apt-get update && apt-get upgrade
Enable IPv4 forwarding:
sysctl net.ipv4.ip_forward=1
nano /etc/sysctl.conf
  and uncomment #net.ipv4.ip_forward=1
DNSMasq
Install and configure DNSMasq on the virtual machine to be used by the Wireguard clients. It will only need to be listening on the Wireguard interface and we will port foward any port 53 traffic from the clients to the dnsmasq service on port 12345.
apt-get install dnsmasq
Edit /etc/dnsmasq.conf and change the following configuration parameters:
port=12345
interface=wg0
no-dhcp-interface=wg0
and execute
/etc/init.d/dnsmasq restart
Wireguard
apt-get install wireguard
Let’s create the server private and public key:
# cd /etc/wireguard
# wg genkey | tee server.private | wg pubkey > server.public
Open /etc/wireguard/wg0.conf in your favourite editor and add the following content:
[Interface]
Address = 10.66.66.1/24
PrivateKey = <private key from server.private>
ListenPort = 443
PreUp = iptables -t nat -A POSTROUTING -s 10.66.66.0/24  -o ens4 -j MASQUERADE
PreUp = iptables -t nat -A PREROUTING --in-interface wg0 -p udp --dport 53 -j REDIRECT --to-port 12345
PreUp = iptables -t nat -A PREROUTING --in-interface wg0 -p tcp --dport 53 -j REDIRECT --to-port 12345
PostUp = systemctl restart dnsmasq
PostDown = iptables -t nat -D POSTROUTING -s 10.66.66.0/24  -o ens4 -j MASQUERADE
PostDown = iptables -t nat -D PREROUTING --in-interface wg0 -p udp --dport 53 -j REDIRECT --to-port 12345
PostDown = iptables -t nat -D PREROUTING --in-interface wg0 -p tcp --dport 53 -j REDIRECT --to-port 12345
My public network interface in my instance is ens4 so replace that with yours if it's different in the above configuration file.
Let’s startup Wireguard:
wg-quick up wg0
Let’s see if the interface and firewall rules came up:
$ ifconfig wg0
wg0: flags=209<UP,POINTOPOINT,RUNNING,NOARP>  mtu 1380
        inet 10.66.66.1  netmask 255.255.255.0  destination 10.66.66.1
        unspec 00-00-00-00-00-00-00-00-00-00-00-00-00-00-00-00  txqueuelen 1000  (UNSPEC)
        RX packets 31526  bytes 1685992 (1.6 MB)
        RX errors 0  dropped 6  overruns 0  frame 0
        TX packets 6070  bytes 1882052 (1.8 MB)
        TX errors 2  dropped 49 overruns 0  carrier 0  collisions 0

$ wg show
interface: wg0
  public key: 5MB7HUDT1EabcDGecy/tIETdISa3js4067+xmyC8l2k=
  private key: (hidden)
  listening port: 443
$ iptables -vnL -t nat
Chain PREROUTING (policy ACCEPT 0 packets, 0K bytes)
 pkts bytes target     prot opt in     out     source               destination
   0      0 REDIRECT   udp  --  wg0    *       0.0.0.0/0            0.0.0.0/0            udp dpt:53 redir ports 12345
    0     0 REDIRECT   tcp  --  wg0    *       0.0.0.0/0            0.0.0.0/0            tcp dpt:53 redir ports 12345

Chain INPUT (policy ACCEPT 0 packets, 0K bytes)
 pkts bytes target     prot opt in     out     source               destination

Chain OUTPUT (policy ACCEPT 0 packets, 0K bytes)
 pkts bytes target     prot opt in     out     source               destination

Chain POSTROUTING (policy ACCEPT 0 packets, 0K bytes)
 pkts bytes target     prot opt in     out     source               destination
    0     0 MASQUERADE  all  --  *      ens4    10.66.66.0/24        0.0.0.0/0
Let’s enable wireguard to come up automagically at boot:
systemctl enable wg-quick@wg0
At this point you have Wireguard listening on port 443 of your VM and ready for clients to connect.
Generate and configure Wireguard clients
Now the server is ready we can connect clients (or client gateways).
Client certificates
We first need to generate certificates for each client.
cd /etc/wireguard
wg genkey | tee client1.private | wg pubkey > client1.public
Client configuration
Let’s create a basic client block in the file client1.conf with a client private key, the client IP address and DNS server it will use.
[Interface]
PrivateKey = <private key from client1.private>
Address = 10.66.66.2/24
DNS = 10.66.66.1
The next block will configure the peer (aka our VPN server IP address) and the allowed IP addresses that this client will route to the VPN server.

[Peer]
PublicKey = <public key from server.public>
Endpoint = <your server public IP address:443>
AllowedIPs = 0.0.0.0/0
PersistentKeepalive = 25
The AllowedIPs setting has a few different configuration possibilities depending on your scenario:
- 0.0.0.0/0 -> this will allow the VPN client to function as a default gateway and all client traffic will be routed through the VPN server and NATed to the outside
- 10.66.66.0/24 -> this will allow devices behind your client (eg NAS or IoT devices on your home network) to connect to other VPN clients.
Server peer configuration
We also need to tell the server the public key of the new client to allow it to connect. We will also tell the server which IP ranges are reachable through this client (eg. IP ranges of your IoT devices behind that client). Add the following to your /etc/wireguard/wg0.conf.
# Client1
[Peer]
PublicKey = <public key from client1.public>
# IP ranges that are assigned or can be reached through this client
AllowedIPs = 10.66.66.2/32, 192.168.10.10/32
192.168.10.10 is for example a temperature sensor in the local network of client1 (where client1 is running Wireguard on a Raspberry Pi).
Now bring the Wireguard service down and up to read the new configuration:
$ wg-quick down
$ wg-quick up
$ wg show
interface: wg0
  public key: 5MB7HUDT1EabcDGecy/tIETdISa3js4067+xmyC8l2k=
  private key: (hidden)
  listening port: 443

peer: VlzZRm4Xeq1/QX3swN4hAC4cvG3pH4yp3VfaBLzUrwg=
  endpoint: <public IP address of client>:23202
  allowed ips: 10.66.66.2/32, 192.168.10.10/32
At this point you can transfer the client1.conf file to any client device and import it in the Wireguard client.
In another post I’ll describe how to setup a Raspberry Pi as a Wireguard gateway to your local (home) network and (IoT) devices in that network.