BirdCam and a Raspberry Pi
Introduction
As a side project my son and I decided to build a bird nest box with a camera. We wanted to include day and night vision, live Youtube streaming, motion detection and the automatic notification and uploading of pictures and videos to Google Photos when activity is detected in the box. This is a small writeup of the project.
Hardware
Bird nest box
The nest box was build and painted by my son and his grandpa from some wood. Nothing fancy here, but a fun thing to do. The roof is angled so we were worried the webcam would not fit easily, luckily we chose a webcam that came with a hinge to install so the camera could be put in any angle we wanted.
Camera
We wanted a camera that could do day and night (IR) vision and was easy to install. First we considered a Raspberry Pi with the night camera and separate IR LEDs. In the end we went for a wired camera with integrated IR LEDs and a Power-over-Ethernet connection for easy installation. We could have chosen a wireless camera but as we had a ethernet connection nearby we chose the wired version. It’s a GolBong HD Network Bird Box Camera model 4901 that can be bought in the EU from Green Backyard for 109 EUR. Installation was super easy and after connecting it to our home network through the switch we got a video stream right away. The camera supports 1920x1080 at 25 fps over an RTSP stream which is good enough for our purpose.
TP-Link Smart Plug HS100
To be able to turn the camera on and off remotely we chose to connect it up to a Smart Plug. The Smart Plug is not connected to the TP-Link cloud and is controlled through a Python script from the Raspberry Pi.
Raspberry Pi 3 B+
The platform running the streaming software, motion detection and other control bits and pieces is running on the Raspberry. It’s an awesome piece of hardware that runs this load easily. We bought a starter kit for 69 EUR that included the board, case, SD card and power supply.
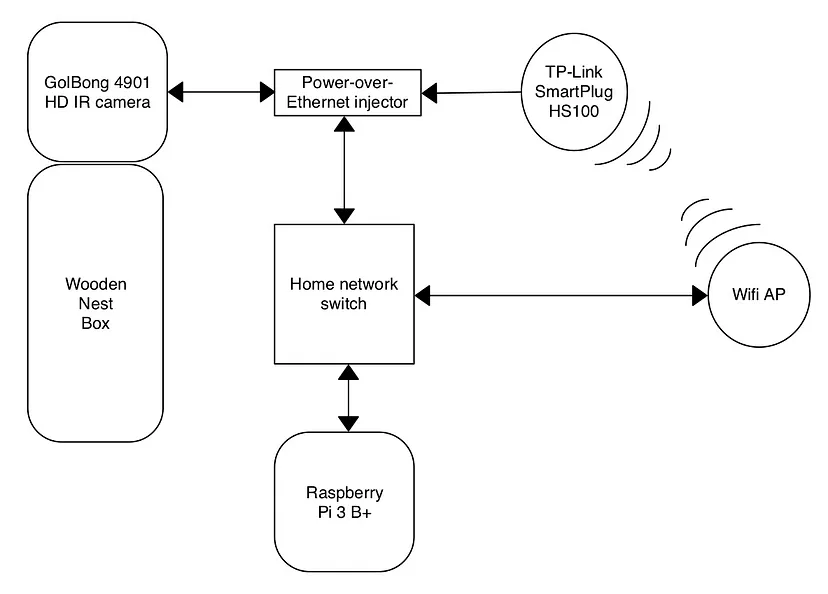
Hardware schema
See below for a schematic overview of our setup.

Software
Raspbian Stretch Lite
Downloaded the image from the Raspberry website, flashed it to a SD card and booted the Raspberry Pi. All easy and took about 30 minutes.
FFMPEG
ffmpeg is the software we use to read the RTSP stream from the camera and stream it to our Youtube Live stream. We had to compile it for the Raspberry Pi for which we used the script prepared by ‘tropho’ from the raspberrypi forum. We had to tinker a bit with the ffmpeg flags but in the end settled for the below command to get us the RTSP video and audio stream and stream this live to our Youtube Channel.
/home/pi/ffmpeg/ffmpeg -f lavfi -i anullsrc -thread_queue_size 10240 -rtsp_transport tcp -stimeout 60000000 -i ${RTSP_URL} -tune zerolatency -s 1920x1080 -r 25 -vcodec libx264 -pix_fmt + -c:v copy -c:a aac -strict experimental -f flv ${YOUTUBE_URL}/${YOUTUBE_KEY}
Replace the RTSP_URL with the URL from the webcam and the YOUTUBE flags with the URL and KEY from your live stream.
The webcam URL for our webcam with the default admin/admin credentials is:
rtsp://[IP ADDRESS WEBCAM]/user=admin&password=tlJwpbo6&channel=2&stream=0.sdp?real_stream
The Youtube live flags can be found at www.youtube.com/livestreaming -> Create New Stream -> Ingestion. You can find the Stream URL and Stream Key there.
After inserting the 3 variables in our ffmpeg command line the live stream from the camera showed up on YouTube, pretty cool :). Some ffmpeg parameters we had to play with were:
- ‘stimeout’ — this timeout made sure that when the camera was unreachable for a small amount of time the ffmpeg socket would stay open and resume when data was coming in from the RTSP stream again. See the excellent ffmpeg documentation for explanation on the other parameters.
Motion
Motion is an OSS package that can be used to detect motion in a video stream, exactly what we wanted. As we do not want to watch the live stream all the time we want to detect birds coming in and out and be alerted to that through email. Motion is perfect for that. It supports RTSP streams, can apply masks to exclude detection areas, has a ton of fine tuning parameters and has an event framework to trigger custom actions when eg a motion video is detected.
apt-get install motion
Configuration settings we changed in motion.conf:
width 1920
heigth 1080
netcam_url rtsp://[IP ADDRESS WEBCAM]/user=admin&password=tlJwpbo6&channel=1&stream=0.sdp?real_stream
threshold 3000
event_gap 30
stream_port 0
webcontrol_port 0
on_movie_end /home/pi/upload-and-delete.sh (this script will push the pictures and movie to Google Drive and send out an email, see below)
This is our upload-and-delete.sh script:
#!/bin/bash
rclone -v move --config /home/pi/.config/rclone/rclone.conf /var/lib/motion/ birdcam:birdcam --delete-after --include *.jpg --include *.avi
echo "Movie created in Google Drive" |  mail -s "Bird Camera has detected Motion!" $EMAIL
We use RClone to upload the pictures and vids to Google Drive for easy sharing. How to setup RClone can be found here.
TP-Link Smartplug HS100
The Smart Plug is connected to our home wifi and controlled by a Python library to be able to turn the webcam on and off.
wget https://github.com/softScheck/tplink-smartplug/archive/master.zip
We are using the below commands to turn the smart plug (and the webcam) on and off:
/home/pi/tplink/tplink_smartplug.py -t [IP ADDRESS OF PLUG] -c on
/home/pi/tplink/tplink_smartplug.py -t [IP ADDRESS OF PLUG] -c off
As we do not want the smart plug to connect to the TP-Link Cloud we make sure the TP-Link cloud server resolves to localhost by adding below line to /etc/hosts:
$ /home/pi/tplink/tplink_smartplug.py -t [IP ADDRESS OF PLUG] -c cloudinfo | grep server
$ echo "127.0.0.1 n-devs.tplinkcloud.com" >> /etc/hosts
In general we run tmux on the Pi and have motion, ffmpeg and htop running there.
See source code repository on https://github.com/hacktobeer/BirdCam